
You will need:
Typically, you will use a computer monitor for setup purposes even if you intend eventually to use your PVR with a television. You will also need a means of obtaining the KnoppMyth CD (usually, a broadband Internet connection and a working computer with a CD burner). Ideally, you should have a separate working computer available during the installation process for research purposes; see our list of documentation and support resources below.
Once you've installed your pcHDTV card and any other interface cards, locate your computer in a convenient spot, and attach all of its cables and peripherals. Be sure to connect your antenna or antennas. (With current hardware, you will need at least one connection into your computer for every television programming source you want to receive; for example, if you want to receive both ATSC and NTSC broadcasts, you will need two antenna connections.)
This guide is based upon KnoppMyth R5A9. The installation process is
likely to get easier in future KnoppMyth releases.
KnoppMyth releases can be downloaded from a
KnoppMyth mirror (DreamHost and rdt1 are two).
Once you've downloaded an ISO9660 image, verify its checksum with
the md5sum program and then burn it to a CD-R disc using your
favorite CD recording software.
Ensure that your MythTV system is set to boot from CD-ROM. Put your KnoppMyth disc into the CD-ROM drive, and power on the computer.
This installation process will wipe out any contents of the hard drive onto which KnoppMyth is installed, unless you understand the installation process in sufficient detail and choose to ask it to do otherwise.
At the boot: prompt, press Enter.
If you receive a note about an "undefined video mode", press the space bar; otherwise, don't worry about this. (This appears most likely to occur if you have your machine connected to a television rather than a computer monitor.)
If you are using an IDE drive at /dev/hda for your installation, you can use
KnoppMyth's "Auto Install". Auto install repartitions and formats the hard
drive with a suitable default configuration. If you prefer to customize your
installation differently, you can choose Manual Install and follow the steps
below. If you are using SATA or SCSI, you must choose Manual Install at this
time. Later releases of KnoppMyth will support greater customization of the
Auto Install.
If using Auto Install, choose option 2 from the menu. Follow the on-screen instructions to enter a username, password, root (administrator) password, and hostname. Note that user "mythtv" is created separately, with password mythtv. When installation completes, you will be left with a prompt. Reboot and remove the CD to continue:
root@tty1[/]# rebootContinue to step 4, below.
Choose Manual Install (option 4) from the intital KnoppMyth menu.
Begin by partitioning the hard drive onto which KnoppMyth will be installed.
Choose option 3, "Partition", from the KnoppMyth installation main menu.
In our example, we are installing on /dev/hda, the first
(master) hard drive on the first (primary) IDE/ATAPI controller. If you
are installing onto a different hard drive, you'll need to select that
hard drive instead. (You can select a hard drive by highlighting it
and pressing the space bar.) If your computer uses serial ATA (SATA) for
its primary drive, your installation will most likely be to
/dev/sda.
KnoppMyth expects a specific configuration of partitions that works well for storing the large video files HDTV creates. A suitable partition layout for KnoppMyth is as follows:
partition one,    /        the root filesystem (5000MB)
partition two,    swap	   as large as your physical RAM
partition three,  /cache   for storing live TV buffer files (10000MB)
partition four,   /myth    for storing recordings and other media (as much as possible)
Choose the hard drive to be partitioned from the menu and press the space bar to select it; then press Enter.
You will then need to partition the hard drive using cfdisk.
Pressing h within cfdisk gives brief instructions, or
you may wish to consult the
cfdisk manual at this point.

Screenshot 1: cfdisk, showing a drive's partition table
In short, you move among the options at the bottom of the screen with left
and right arrow keys or type the first letter of the option you want to
select. First, delete any existing partitions on the hard drive you are
partitioning. (Note that this will result in loss of any existing data
on that hard drive; if your system contains multiple hard drives, please be
certain you are partitioning the hard drive you intended to partition!)
Create a new partition, set its type to "primary", enter its size
in megabytes (we recommend 5000 MB), and set its type to "Linux" (83).
Select [Bootable] for this first partition. This will be your
root partition, /, where the KnoppMyth software is installed.
Create a second partition, the size of your physical RAM, and set its type
to "Linux swap" (82).
Create two more "Linux" (83) partitions, 10,000 MB /cache and the
remainder /myth. (Whenever cfdisk asks you where a new
partition should be located, choose [Beginning].)
When you are done partitioning your hard drive, you should select
[Write], followed by [Quit]. If you exit
cfdisk without Writing, none of your changes will be saved.
Now choose menu item 1, "Configure Installation". You will be asked a small number of questions about your system. When prompted, choose the partition in which KnoppMyth should be installed (your root partition), and select it by pressing the space bar, and then press Enter. When prompted, also enter your username and password information, and choose an administrative (root) password. You will need to use the root password later. Note that user "mythtv" is created separately, with password mythtv. When prompted, indicate that the LILO bootloader should be installed into the Master Boot Record (MBR) of the hard drive. Finally, give your computer a hostname, or accept "box" as the default name.
Now choose menu item 2, "Start Installation". You will be asked to confirm the choices you made in the "Configure Installation" dialogues. Do so by choosing "Yes" and pressing Enter. At this point, KnoppMyth will install software onto your hard drive. A small number of error messages at the conclusion of this process are normal and do not indicate a problem.
When the system prompts you to remove the CD, remove it and press Enter. The system will then attempt to reboot using the KnoppMyth system that has been installed on the hard drive.
During the reboot process, KnoppMyth will launch an XWindows graphical desktop. It should become quickly apparent whether KnoppMyth has chosen appropriate graphics settings. If you see a graphical display, with Tux in his living room, KnoppMyth has detected your graphics settings properly; if you see an error about video modes, it has not.
Using a computer monitor rather than a television significantly
increases the chance that KnoppMyth will get your video settings
right out-of-the-box. If you intend to use a television but
KnoppMyth does not provide appropriate video output, try using
a computer monitor initially for setup purposes, and consult
the resources described below for more
information about perfecting your video settings. In general,
whether you are using a television or a computer monitor,
if you don't have a good on-screen display or display resolution,
you will need to change the X server configuration at this point.
In some cases, running xf86cfg as root may assist in
this process; if you need more help, please consult the
resources described below.
If you have success with a particular video card, you are encouraged to submit your XF86Config-4 file to the KnoppMyth project so that other users can benefit from your experience.
NVIDIA has pursued an anachronistic and counterproductive policy of publishing its drivers in binary-only form and refusing to release sufficient information for the creation of a free/open source driver. For this reason, we are eager to collect information about users' success with other manufacturers' video cards, and hope to publish more detailed information about other video cards here following tests later in January 2005.
Please contact NVIDIA and ask them to release a free/open source driver or information sufficient to allow third parties to create one.
2701 San Tomas Expressway
Santa Clara, CA 95050
Tel: 408-486-2000
Fax: 408-486-2200
E-mail: linux-bugs@nvidia.com
(NVIDIA's policy about this has been established and unchanged for years, but it has not improved and NVIDIA still needs to hear that current and prospective customers are dissatisfied.)
If you have an nVidia based video card, we recommend installing its drivers now.
You may also wish to use
our XF86Config-4 file, which we've found
to work with the NVIDIA GeForce FX5200; to use it, you'll need to install it as
/etc/X11/XF86Config-4. You can do this by downloading it
from within a web browser and then running commands such as
root@box:~# mv /etc/X11/XF86Config-4{,.original}
root@box:~# mv -f fx5200-XF86Config-4 /etc/X11/XF86Config-4
You will need to leave the graphical XWindows desktop to install the new graphics drivers.
Ctrl-Alt-F1 takes you to a text window.
box login: root
Password: [enter your root password]
root@box:~# cd /usr/src
root@box:~# tar xjvf kernel<TAB>
root@box:~# install-nv<TAB>
This will install the NVIDIA drivers and restart GDM. (Note that
this will taint your kernel;
you will receive a syslog message such as
"box kernel: nvidia: module license 'NVIDIA' taints kernel.")
Our configuration should be suitable for use with either a computer
monitor (via the VGA interface) or a television (via the DVI
interface); you might need to adjust the resolution if the default
resolution is inappropriate for your display device. You can
cycle through supported display resolutions by pressing
Ctrl-Alt-Plus or Ctl-Alt-Minus.
After a successful reboot from the hard drive, you'll be prepared to continue with the configuration of MythTV. Note that, when using the Fluxbox window manager which is the default on KnoppMyth, you'll need to keep your mouse pointer located within the borders of the window you want to type in.
For now, ignore the window that is initially displayed and asks for your root password. You will want to return to this window later.
Now open up a new xterm. To do this, right-click on the desktop,
select XShells, and then select Xterm.
Screenshot 2: a new xterm after entering the root password
Become root.
sh-3.00$ su -
	[enter the root "administrative" password]
Depending on your hardware and network configuration, your machine may or may not have started networking automatically. If it has not connected automatically (test by pinging a known host), you will want to start that now. (Here we assume that your machine is connected to a network that provides DHCP service. If not, you will need to follow the general procedure that you ordinarily follow for manual network configuration. In some cases, it is currently necessary to start networking manually every time your KnoppMyth system is rebooted.)
Test for network connectivity:
root@box:~# ping -c 1 google.com
PING google.com (216.239.57.99): 56 data bytes
64 bytes from 216.239.57.99: icmp_seq=0 ttl=242 time=11.2 ms

--- google.com ping statistics ---
1 packets transmitted, 1 packets received, 0% packet loss
round-trip min/avg/max = 77.6/78.1/79.8 ms
If instead you wait a few seconds and see nothing, follow the next
step to run dhclient.
root@box:~# dhclient
Be sure to set your timezone properly, or program guides won't align
properly and scheduled recordings won't work. Ensure that your system
clock is set accurately with respect to the selected timezone. (Sometimes,
the time may need to be corrected, especially if your computer has been
unused for a long time or previously used a non-Linux-based operating
system. Once you have your system running, you can keep the time
properly adjusted with the ntpdate utility.)
Now it's time to find whether the system can recognize your ATSC capture
card. To find the device number of your pcHDTV card, run dtvsignal:
$ dtvsignal /dev/dtv0 [channel frequency]
If it's not dtv0, increment the device number, e.g.
/dev/dtv1, /dev/dtv2, etc.
(/dev/dtv0 is the most likely possibility on a system containing
only a single pcHDTV card.)
It helps if you know a frequency with a strong DTV signal. Within the United States, you can find the frequency of a local DTV station, and its compass direction from your location, by entering your ZIP code the Antennaweb.org site, operated by the Consumer Electronics Association. (Follow the "choose an antenna" link at Antennaweb.)
If you have selected the correct device, dtvsignal will return a chart something like this:
sh-3.00$ dtvsignal /dev/dtv2 19
main: argc 3 argv[1] /dev/dtv2
channel 19
freq*16 = 8020
main: ioctl 1 rtn 0
main: ioctl 2 rtn 0
dtvsignal ver 0.1 - by Jack Kelliher (c) 2002
channel = 19 freq*16 = 8020
 30db       0%         25%         50%         75%        100%
Signal:     |     .     :     .     |     ._____:_____._____|
Signal: 033 ----------------
While the dtvsignal program's bar graph is displayed on
your screen, it will be updated to display the current signal
strength in real-time, and so you can watch it as you reorient or
relocate your antenna as necessary to get a strong signal. When
you're satisfied, you can exit dtvsignal by pressing
Ctrl-C.
If you guess an incorrect device number, instead of a signal strength bar graph, you'll typically see a result similar to this one:
sh-3.00$ dtvsignal /dev/dtv1 19
main: argc 3 argv[1] /dev/dtv1
No such device - couldnt open file /dev/dtv1
On our test machine, the HD-3000 was called /dev/dtv2;
we refer to the name of the HD-3000 capture device as
[dtvdevice] in the instructions below.
Now you'll need to set up Zap2it channel listings for your local DTV broadcasts, so that MythTV will know what's on TV when. From this point forward, we suggest that you have a graphical web browser installed on your MythTV machine. For example, you might choose Mozilla Firefox:
root@box:~# apt-get update
root@box:~# apt-get install mozilla-firefox
	[confirm the download and installation of the Firefox browser]
(That won't put an icon onto the desktop, but to start Firefox,
you enter firefox & at the shell prompt.)
If you don't want to install Firefox at this point, or you have another computer available, you may use your other computer for this step. At http://labs.zap2it.com/, sign up as a new user. (Zap2it provides guide data free on an individual basis, but asks users to complete a quarterly survey.)
The MythTV "Certificate Code" is ZIYN-DQZO-SBUT.
You'll then need to create a Zap2it "lineup" (a list of channels for which you wish to receive guide data).

Screenshot 3: Telling Zap2it to create a broadcast channel lineup
You'll want to configure a lineup with only digital channels for the pcHDTV card. (If you have a second tuner card that receives NTSC channels, you can create a lineup for it in a neighboring ZIP code; currently it is difficult to use a lineup that mixes ATSC and NTSC channels. Therefore, you should unselect all channels before beginning to create your lineup.)

Screenshot 4: Zap2it shows local channels available for selection
You'll have the smoothest experience if you start out with only channels
you know you receive. With the antenna set to its optimal position,
run dtvscan:
sh-3.00$ dtvscan [dtvdevice] > chanlist
sh-3.00$ cat chanlist
This will show the listing of channels received in the form
callsign: standard channel: dtv frequency: subchannel;
for example, you might see a line like
KBWB-DT: :20.1 :19: 1:0
That's the WB's digital broadcast, on frequency 19, "channel" 20_1. (Yes, the association between frequencies and channel numbers is confusing to us too.)
Unselect in the Zap2it lineup any channels that don't show up in the
chanlist file. (This will prevent MythTV from trying to
receive channels that are not available in your area; if you want to try
improving your reception, you can also reorient the antenna and try the
dtvscan process again.)
Now you're ready to start MythTV setup. Return to the original setup
window (the first one that showed up on-screen) and enter the
administrator (root) password, as requested. If you have closed that
window, open a new one and run KnoppMyth-run.
Follow the on-screen instructions to select and install the appropriate modules
for your system.
sh-3.00$ KnoppMyth-run
Select i586 for Pentium-class processors, K6, C3, etc. or i686 for PentiumPro-class processors, PentiumPro and above, Athlon and Duron. The default is i586 compiled with LIRC to support a remote. If you have an i686 class processor, select i686 then LIRC. You should not select the XvMC option, even if your video card supports XvMC, because it does not cooperate well with HDTV playback. KnoppMyth will then install the appropriate packages and start mythtv-setup.

Screenshot 5: MythTV setup menu
The mouse is not used in MythTV, so you navigate with the arrow keys. If you've attached a remote control adapter to your system, or if it came pre-equipped with one, you can likely also use a remote control to control MythTV at this point. When using arrow keys on the keyboard or arrow buttons on a remote control, up and down arrow move among the options; right and left arrow select check boxes or list choices. Return/Enter/Select moves to the next screen, Esc cancels out of a screen or, when the main screen is displayed, cancels the entire setup process.
The default options are generally all correct, except for those changes indicated below:
In General Setup, third setup screen ("Global backend setup")
TV-Format: ATSC
Channel Frequency Table: us-bcast

Screenshot 6: Global backend settings
In Capture cards setup
New capture card
Card type: pcHDTV ATSC Capture Card
Video device: [dtvdevice] (type into the field)

Screenshot 7: New capture card
In Video sources Setup
New video source
Data Source: North America (DataDirect) gets the Zap2it listings
Name this source HDTV-broadcast
Retrieve listings to download guide data
Note that you must enter your own Zap2it username and password in the video source definition here.

Screenshot 8: New video source
Input connections
Select the HDTV: [dtvdevice] (Television)
Video Source: HDTV-broadcast (the name you created in the previous step)
Starting channel: (we'll get back here later)

Screenshot 9: Input connections
Return to the main screen and press Esc to exit the setup process. The KnoppMyth script will run mythfilldatabase.
Various scrolling messages, including "401 Unauthorized" as the service authenticates, are normal.
The last thing you need to do before starting to watch TV is to set your MythTV to start on a channel where you get a strong signal.
Find a strong signal using dtvsignal. The chanlist generated earlier will list the channels your device could see. MythTV and the pcHDTV driver get confused when initially tuning to a weak signal, and this confusion can be difficult to debug.
$ cat chanlist
$ dtvsignal [dtvdevice] [freqid of a strong channel]
For example, if your DTV tuner is identified as /dev/dtv2 and
you know that you have good reception on local DTV channel 30, you would
enter
$ dtvsignal /dev/dtv2 30
Now find the channel identifier MythTV uses for that freqid. It's easiest to do that through the MythWeb web-based interface. On your MythTV machine, start a web browser and load the URL http://localhost/mythweb/settings_channels.php, like this:
sh-3.00$ firefox http://localhost/mythweb/settings_channels.php &
(We should reiterate here that, if you don't have some software you need, such
as Firefox, you can install it using the apt-get
command; as root, first run apt-get update and then apt-get install [packagename],
where [packagename] is the name of the Debian package containing the software you need.)
If you see an error about the unavailability of a MythTV backend, you should be able to clear it up by running
sh-3.00$ mythbackend -v &If mythbackend complains that it cannot access the
/cache/cacheor/myth/tvdirectories, you will need to check that those have been properly created and/or mounted. If you have followed the default installation schema,/cachewill be the third partition (e.g.,/dev/hda3) and/myththe fourth (e.g.,/dev/hda4). As an alternative, you can create them in the root filesystem.sh-3.00$ su [enter, enter root password] root@box:~# mkdir -p /cache/cache /myth/tv root@box:~# chown -R mythtv /cache /myth root@box:~# exit sh-3.00$ mythbackend -v &You may want to check the file
/etc/fstabto ensure that partitions mount automatically on reboot. If you followed the default scheme on/dev/hda, it should contain:root@box:~# more /etc/fstab # /etc/fstab: static file system information. # #/dev/hda1 / ext3 errors=remount-ro 0 1 /dev/hda2 none swap sw 0 0 /dev/hda3 /cache ext3 defaults 0 2 /dev/hda4 /myth ext3 defaults 0 2 After
mythbackendis running, try to access the MythWeb interface again.sh-3.00$ firefox http://localhost/mythweb/settings_channels.php &
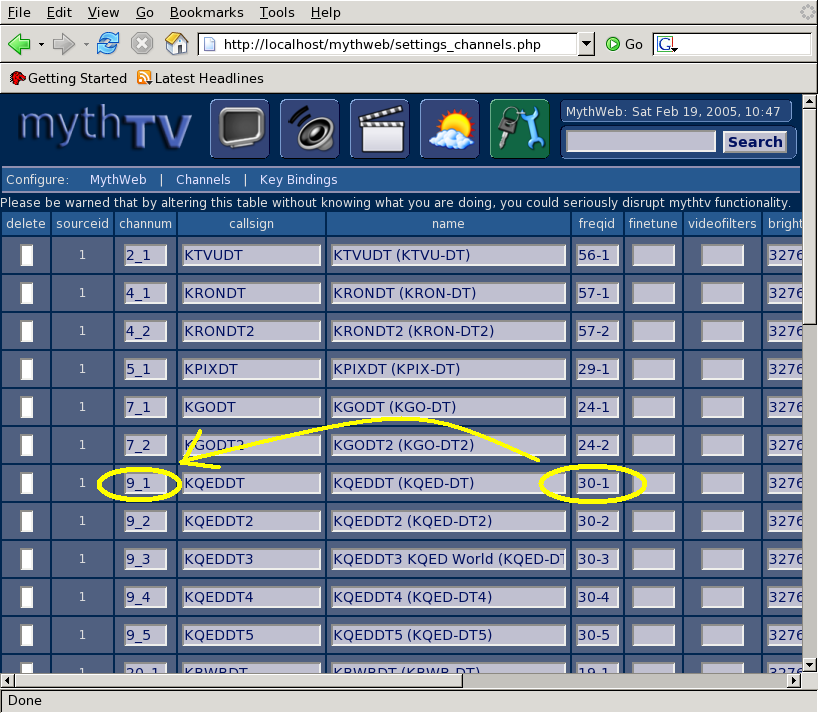
Screenshot 10: Mythweb, showing corresponding freqid and channel number
You can do a lot of configuration and scheduling from the mythweb interface, accessible from your mythbox at http://localhost/mythweb/. For now, we're just going to use it to find a good starting channel number.
Look for your frequency with strong signal in the freqid column, and note the corresponding channum. You may see multiple sub-channels. (In our example, KQED broadcasts on freqids 30-1 through 30-5, which are given channums 9_1 through 9_5.) If you have multiple sub-channels on your strong frequency, pick any one.
Then re-run mythtv-setup, answering "No" to the initial questions. Return to the "Input Connections" menu and enter the full channum, complete with subchannel, as "Starting channel".
Input connections
Select the HDTV: [dtvdevice] (Television)
Starting channel:
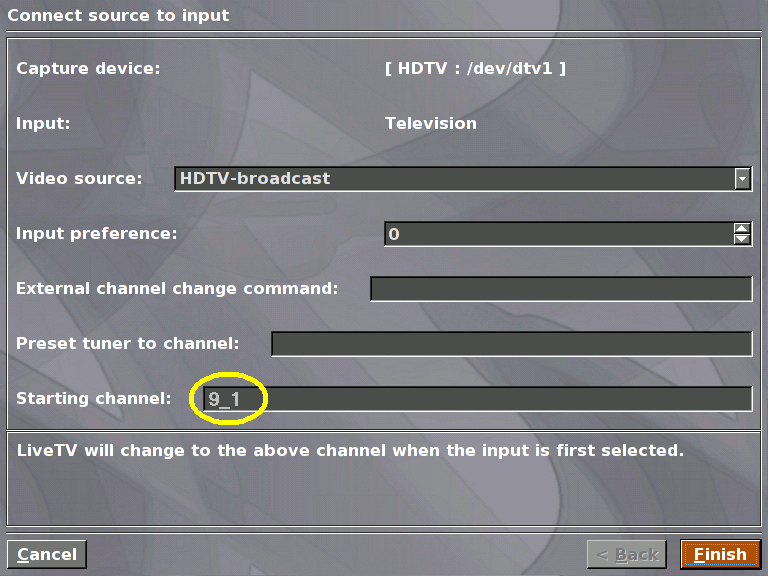
Screenshot 11: Input connections, setting starting channel
Now, you're ready to start the mythfrontend program.
$ mythfrontend

Screenshot 12: MythTV main menu (other themes are available)
A few setup tweaks from within the MythTV application help make browsing and playback smoother. First, in TV Settings - General - Screen 1:
Channel ordering: use database order
This will improve the channel ordering. In TV Settings - General - Screen 2, we recommend setting
Time limit for ATSC Signal Lock: 10000
ATSC signal threshold: 50
Both of these settings ask MythTV to try harder to tune in weak signals. In Playback - Screen 1:
Use Extra Audio Buffering [check]
In Playback - Screen 10:
Always use Browse mode [check]
When you first tune to a particular channel, it is normal for MythTV to take several seconds before beginning to show live TV programming, since it waits to catch intermittent "keyframes" within the MPEG-2 encoded signal.
Since your Myth box will be connecting to the Internet for program guide data, you will want to make sure that it is secure. You don't want someone remotely setting your box to record every episode of "Barney and Friends," or worse, using your machine as a base for attacks on others. You should consider using a firewall and changing the default passwords.
$ passwd
Changing password for mythtv
(current) UNIX password:
Enter new UNIX password:
Retype new UNIX password:
passwd: password updated successfully
Give MythWeb basic security with the /var/www/mythweb/.htaccess file, by removing the # marks (comments) from the first four lines of this file.
root@box# sed '1,4s/^#//' < /var/www/mythweb/.htaccess > /tmp/htaccess
root@box# mv -f /tmp/htaccess /var/www/mythweb/.htaccess
Now create a new web user and password (this is different from the login user):
root@box# htpasswd -c /var/www/htpasswd [username]
You will be prompted to enter a password twice.
If you've gotten this far, either your setup works, or you're scratching your head wondering what went wrong. We try to answer a few of the most common questions here, and recommend the documents linked under other resources if these suggestions don't help.
Now that your KnoppMyth installation is complete, you're ready to delve into the fun part, exploring the MythTV application and all its modules (you didn't think you could just watch TV on this convergence box, did you?). Thorough MythTV documentation is online, as well as on your MythTV box in /usr/share/doc/mythtv-doc/. Of particular note, the file /usr/share/doc/mythtv-doc/keys.txt lists functions you can access through the keyboard or mapped keys on your remote control.
You can keep installed
software up-to-date using the Debian apt-get or dselect programs. You can
also start a MythTV frontend by running mythfrontend at a
shell prompt, or configure MythTV to start up automatically when your
computer is booted.
If you choose, you can set up other client machines that will use your PVR as a server to provide network streaming of recorded programming. You can run a MythTV frontend directly from the KnoppMyth CD. For more on this and other MythTV features, please consult the MythTV and KnoppMyth documentation.
Have fun and keep in touch. Please let us at EFF know how you're using your HD-PVR, and please let your friends know about the broadcast flag restrictions.